In the dynamic world of business, ensuring prompt and accurate payments is paramount for maintaining healthy cash flow and operational stability. A crucial tool in this process is a well-designed invoice, and understanding how to write a invoice template can significantly streamline your financial administration. Many small business owners, freelancers, and consultants often find themselves bogged down by the administrative burden of invoicing, but a robust template can transform this chore into an efficient, professional, and almost effortless task.
An invoice template is essentially a pre-formatted document that contains all the necessary fields and information required for a professional invoice. Instead of creating a new invoice from scratch for every client or every service rendered, a template allows you to simply fill in the specific details for each transaction. This not only saves valuable time but also ensures consistency, accuracy, and adherence to legal and financial best practices.
Beyond mere convenience, a well-crafted invoice template projects an image of professionalism and reliability. It demonstrates to your clients that you are organized and meticulous, which can enhance their trust in your services or products. This seemingly minor detail can have a ripple effect, contributing to stronger client relationships and a more reputable brand image.
This comprehensive guide will walk you through every step of creating an effective invoice template. We'll delve into the essential components, discuss best practices for design and implementation, and explore how to optimize your template for clarity and legal compliance. By the end, you'll have the knowledge to create a template that not only meets your business needs but also facilitates smoother payment processes.
Why a Great Invoice Template Matters
Having a well-structured invoice template is more than just a matter of convenience; it's a strategic asset for any business, regardless of size. It underpins several critical operational and financial aspects, making it an indispensable tool for efficient management.

Firstly, a professional template enhances your brand image. Every interaction with your client, including the invoice, is an opportunity to reinforce your professionalism. A neatly designed, easy-to-read invoice speaks volumes about your attention to detail and commitment to quality, distinguishing you from competitors who might use haphazard methods.
Secondly, it significantly improves efficiency and saves time. Imagine having to type out your business details, client information, and service descriptions from scratch for every single invoice. This repetitive task can consume hours over a month. A template eliminates this redundancy, allowing you to populate predefined fields quickly, freeing up valuable time that can be redirected to core business activities.
Thirdly, an effective template helps in error reduction. Manual data entry is prone to mistakes, whether it's an incorrect service description, a miscalculated total, or an transposed client address. A template minimizes these risks by standardizing information and often incorporating automatic calculations, ensuring accuracy and reducing the need for corrections or re-invoicing.

Finally, a consistent invoice template is vital for financial tracking and legal compliance. It ensures that all necessary information for tax purposes and record-keeping is present on every invoice. Should a dispute arise or an audit occur, having a clear, consistent record of transactions is crucial for demonstrating accountability and adhering to legal obligations. It also aids in projecting and managing your cash flow more effectively.
Essential Elements of an Effective Invoice Template
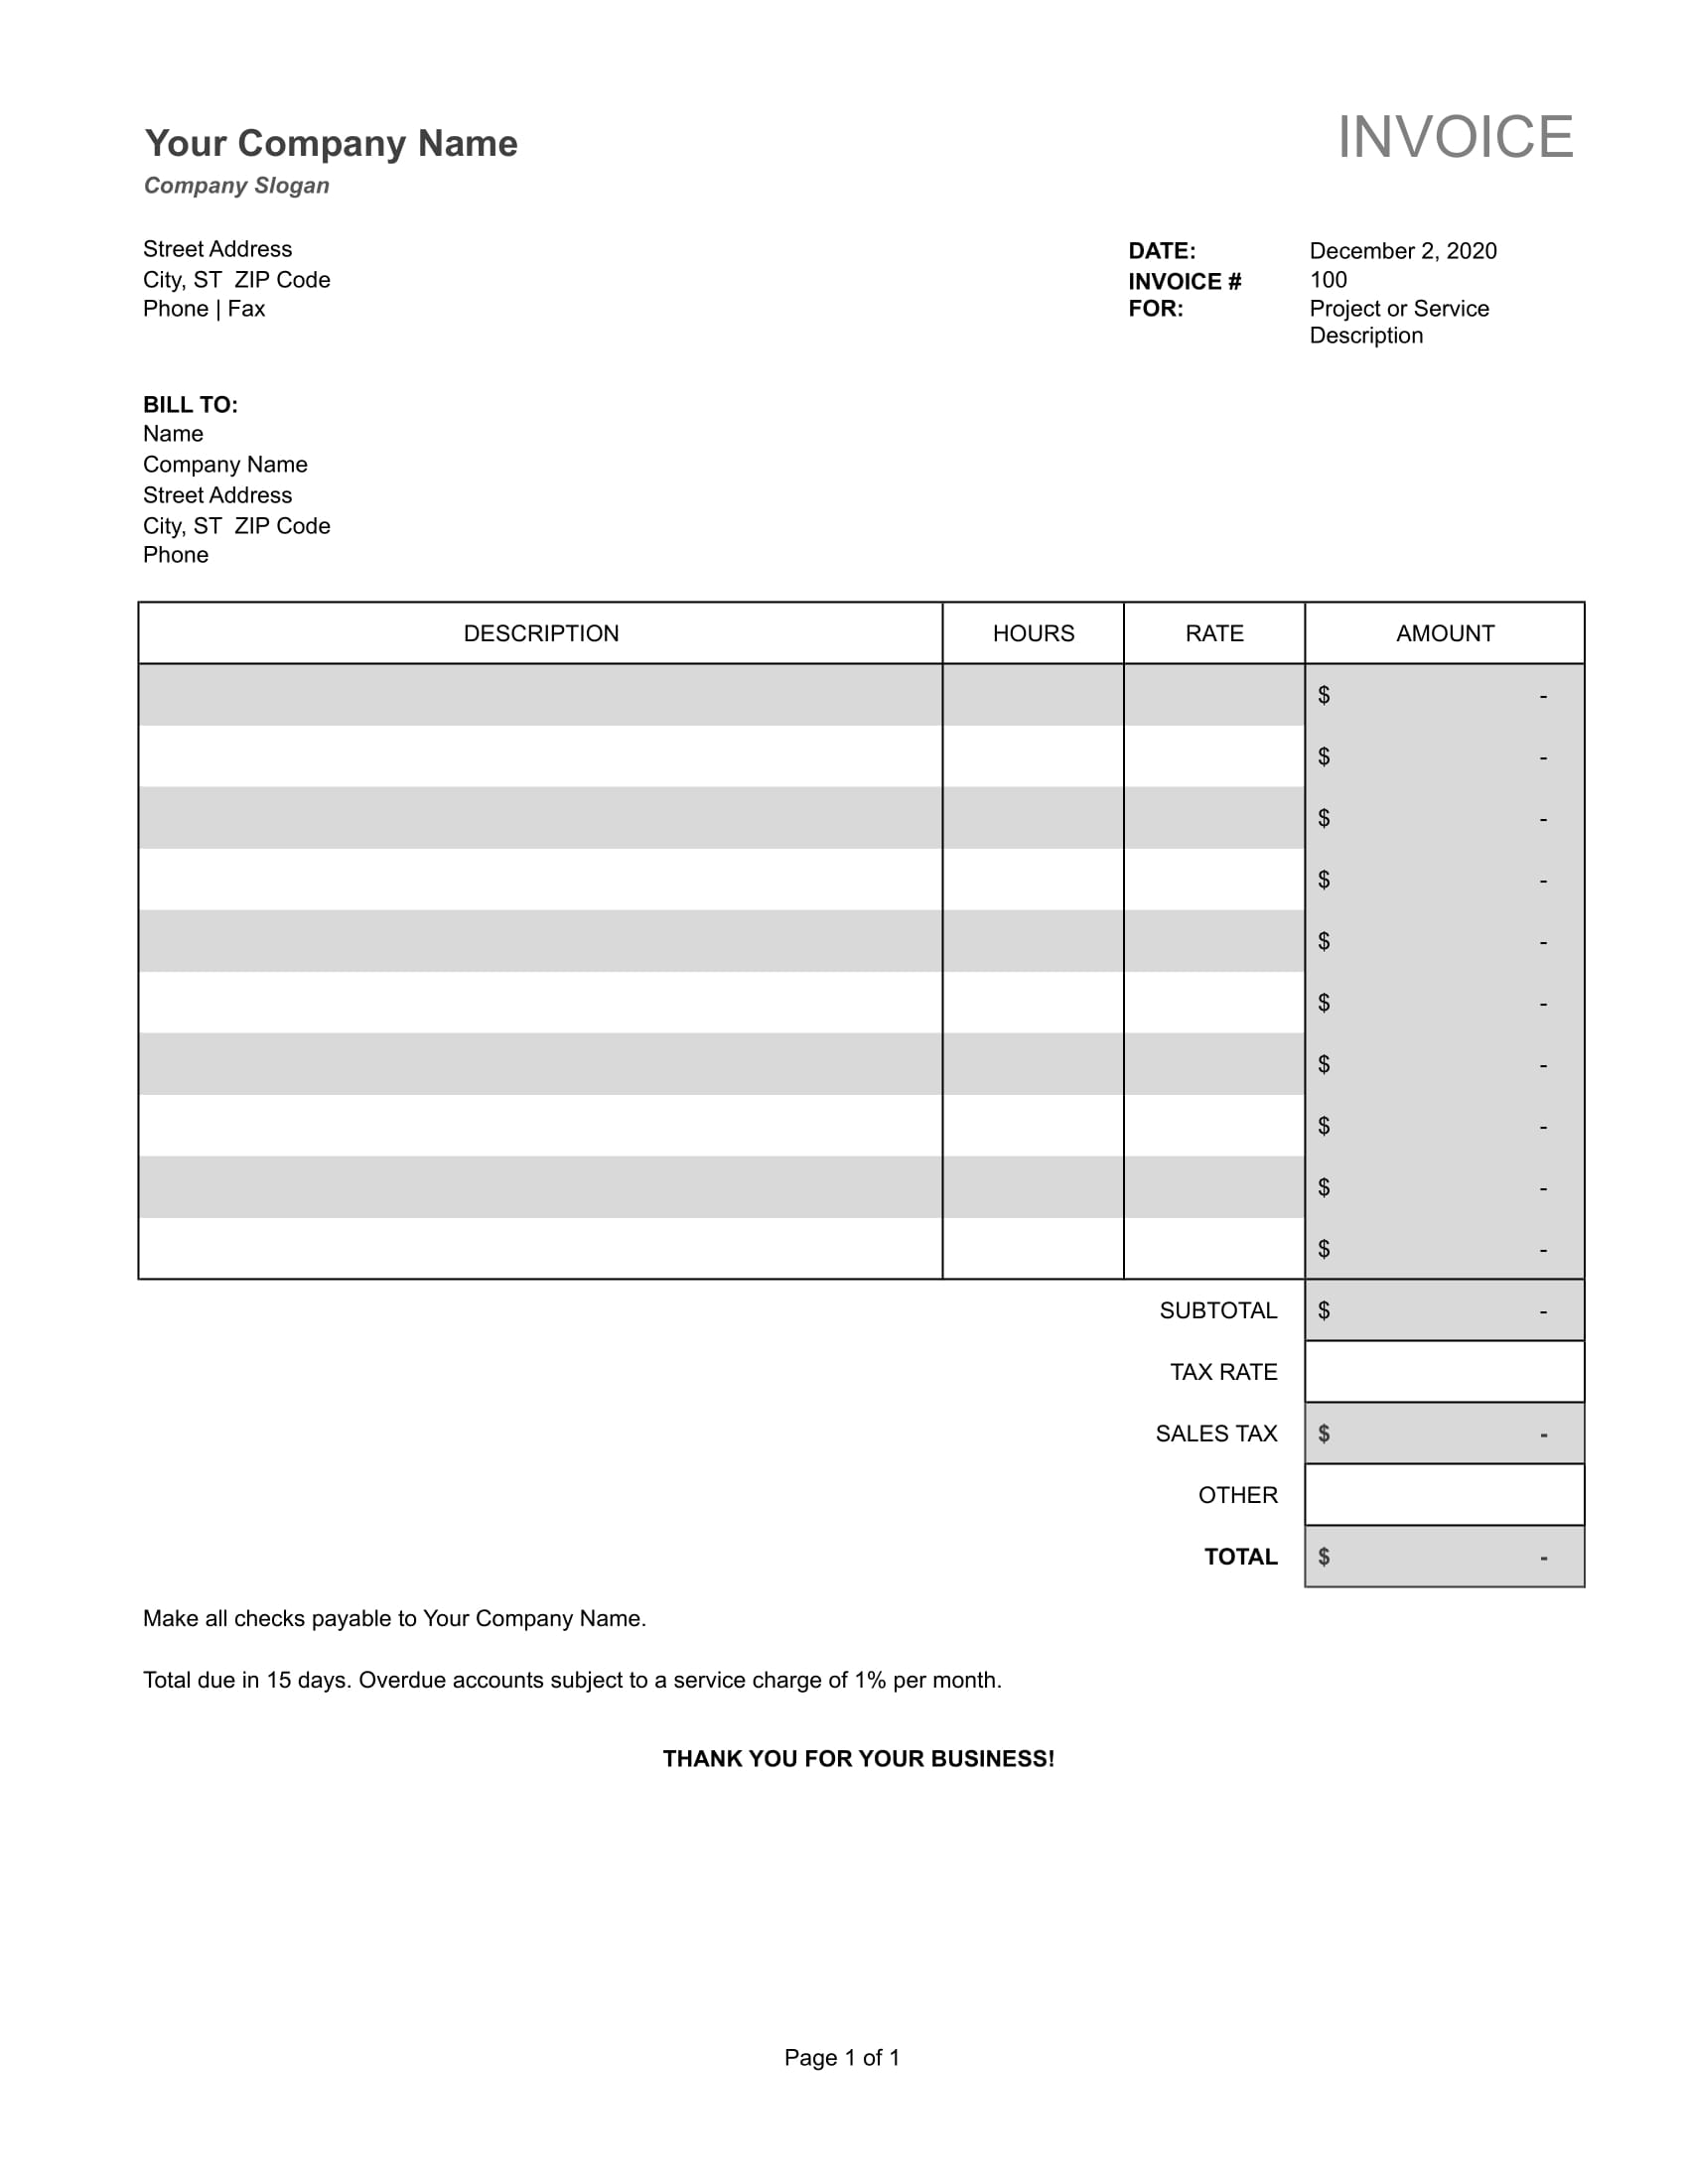
To ensure your invoice template is comprehensive and effective, it must include several key pieces of information. Omitting even one critical detail can lead to delays in payment, confusion, or even legal issues. Here's a breakdown of the must-have elements:

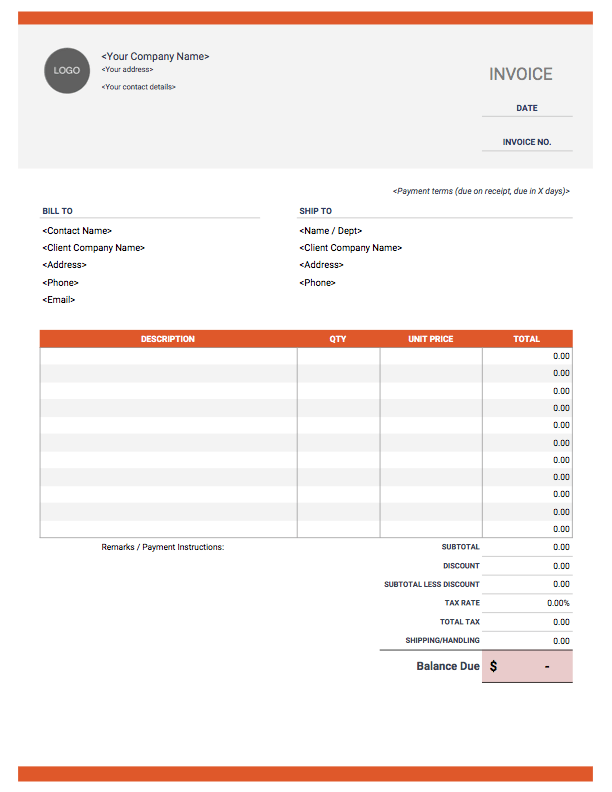
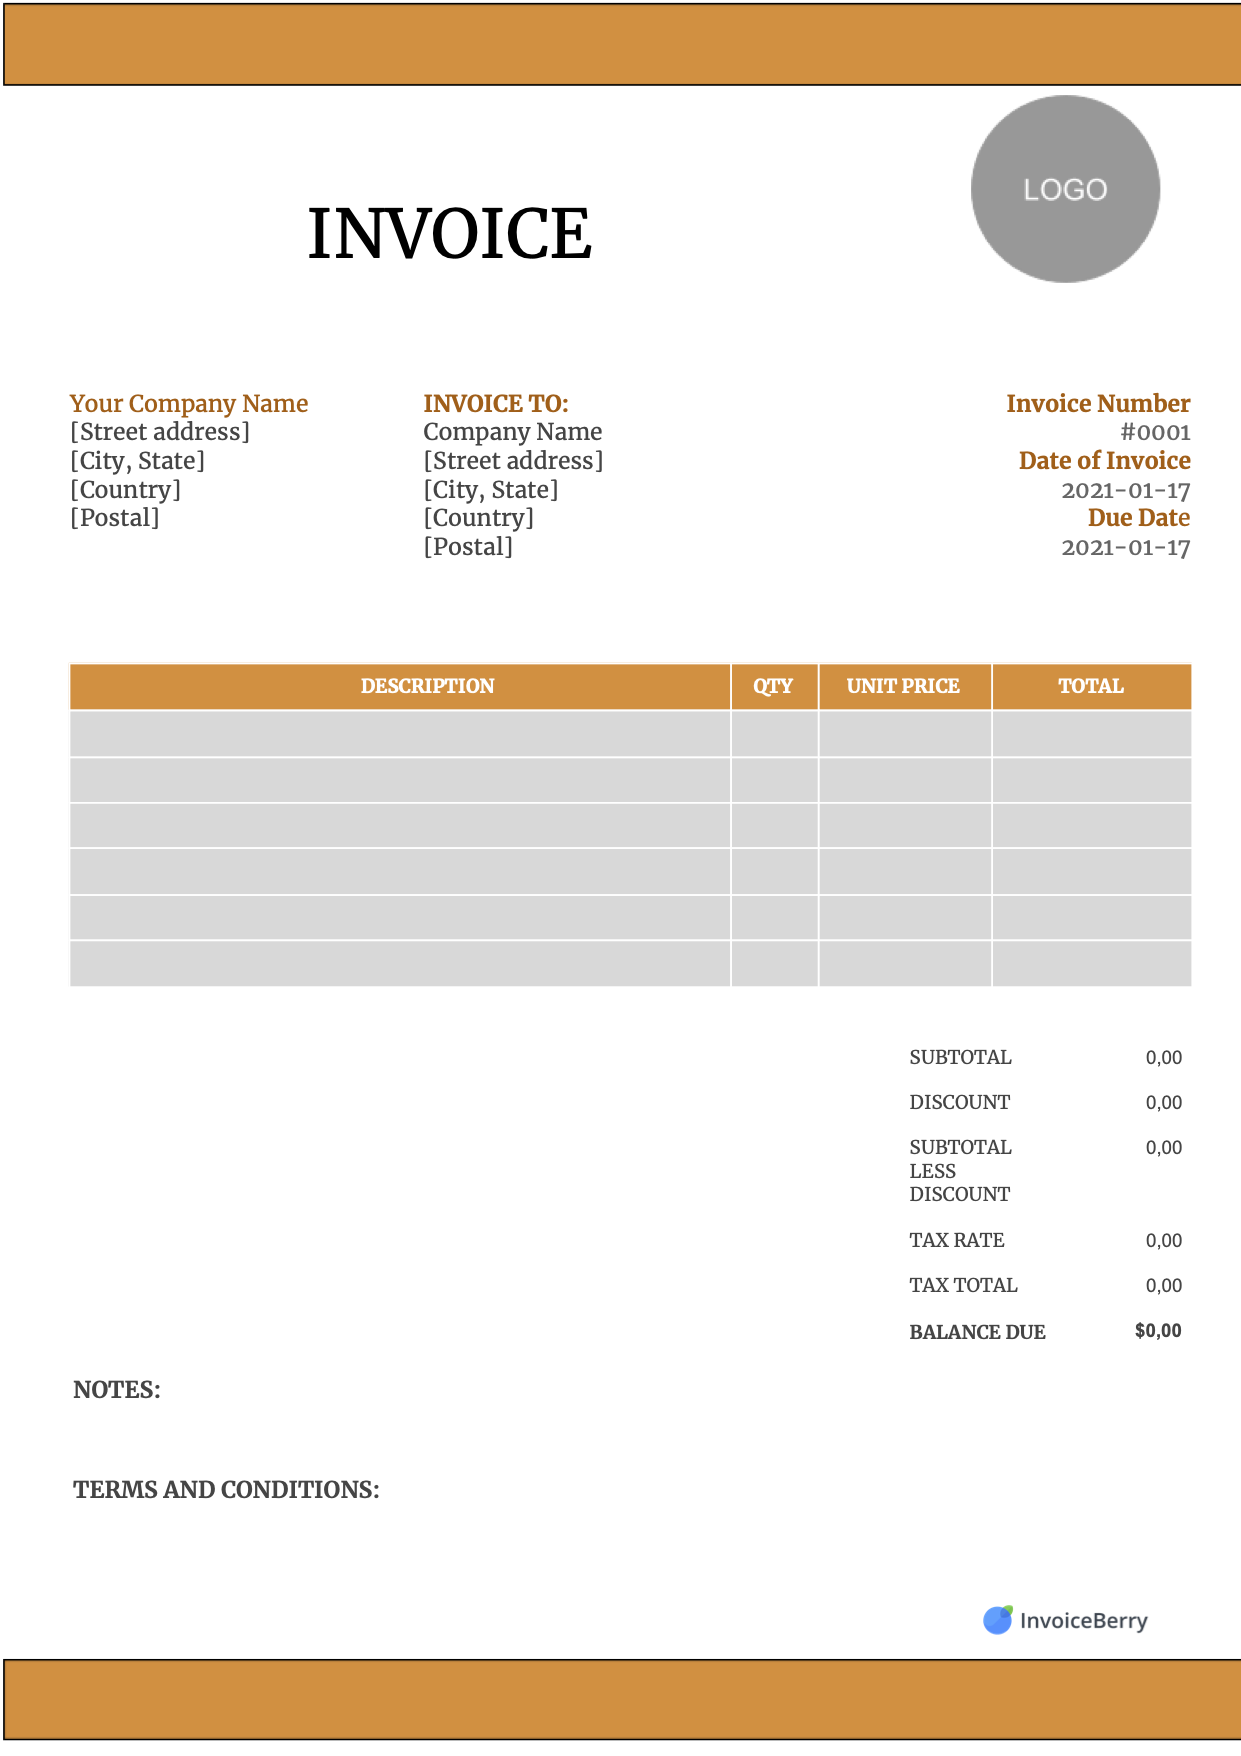
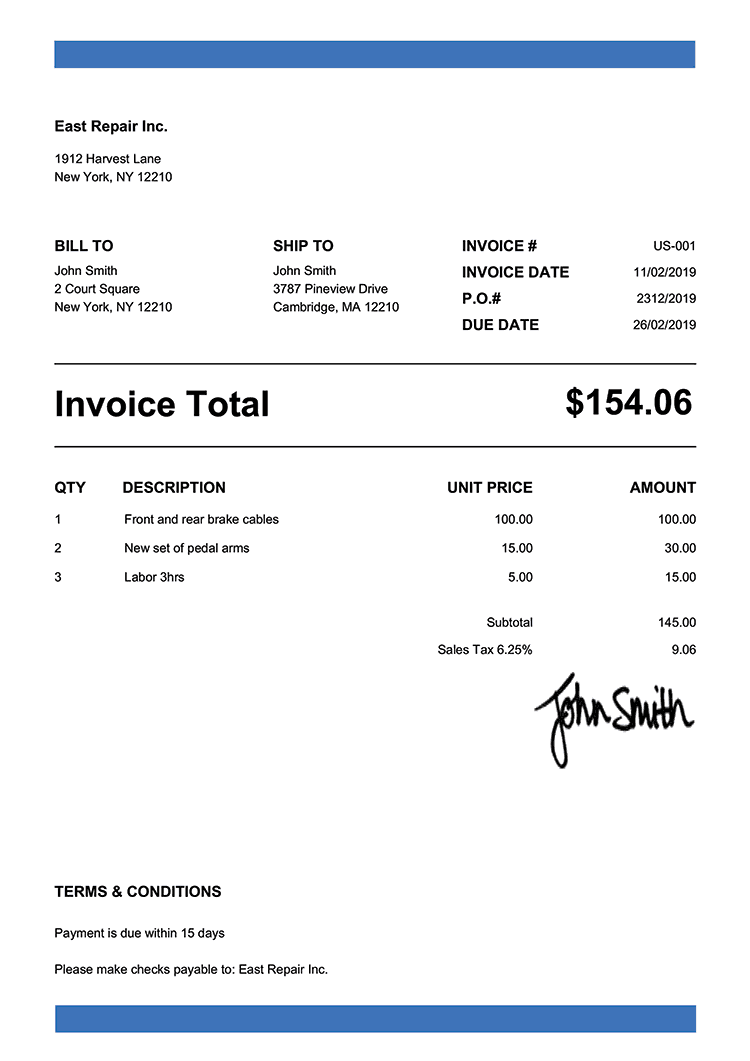
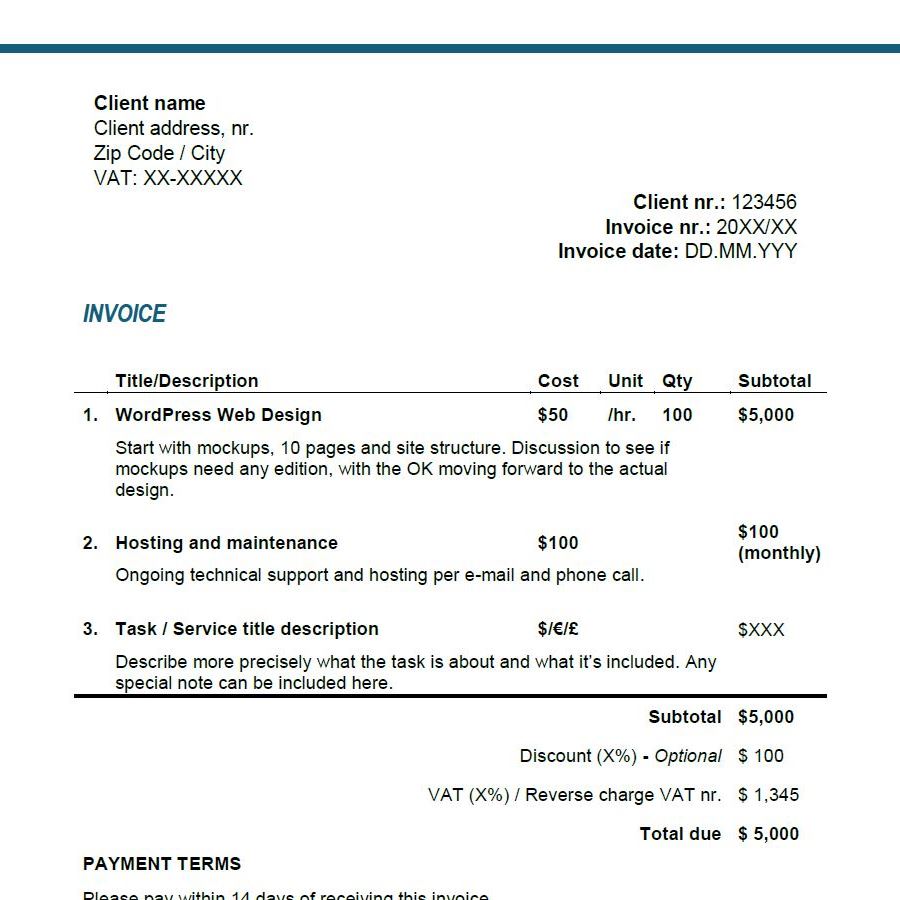
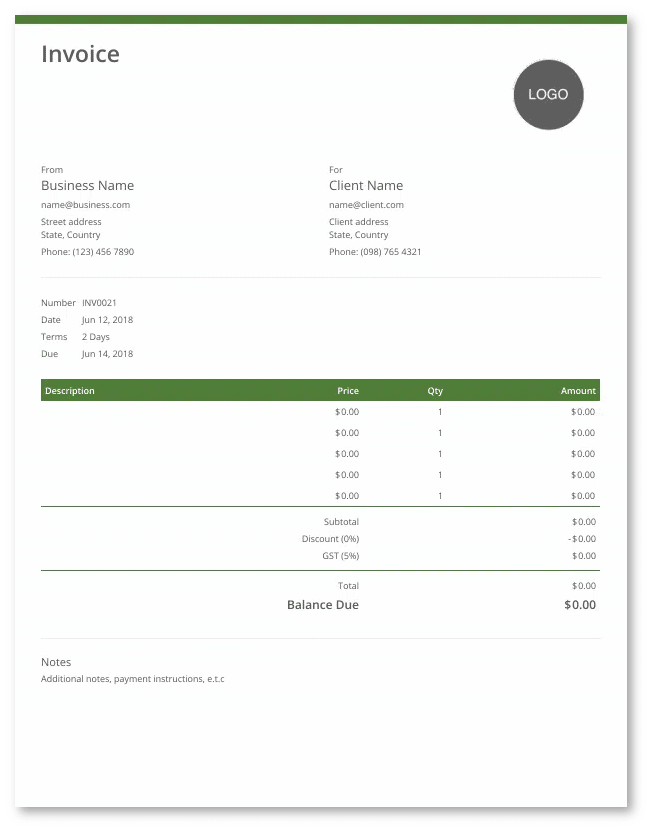
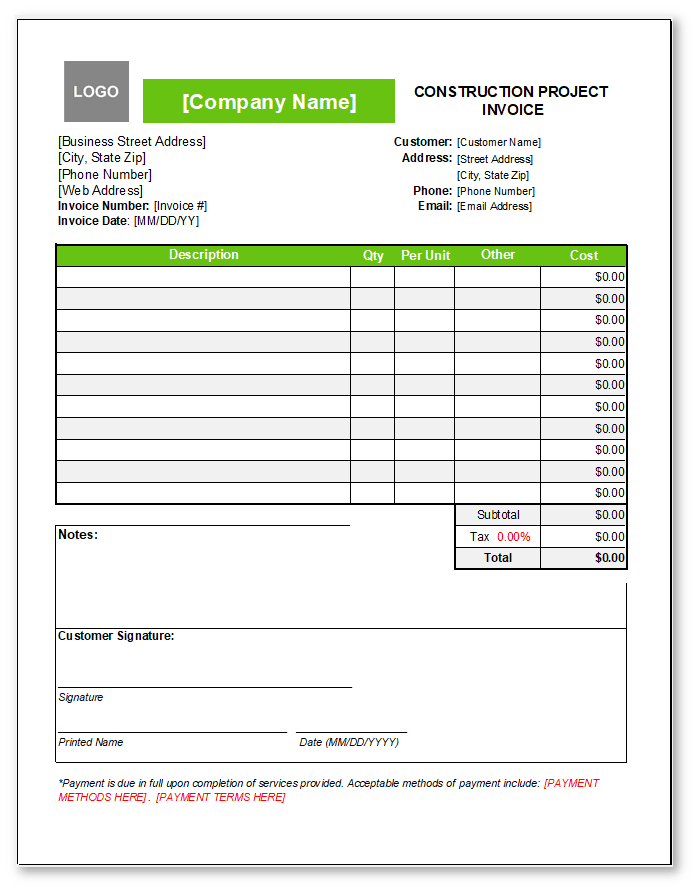
Your Business Information
At the top of your invoice, clearly display your business's official name, logo (if applicable), address, phone number, and email address. This makes it easy for clients to identify who the invoice is from and how to contact you if they have questions. Including your website or social media handles can also be beneficial.

Client Information
Accurately list the client's full business name (or individual name), address, contact person, phone number, and email address. Double-checking this information is crucial to ensure the invoice reaches the correct recipient and can be processed without delay.

Invoice Number and Date
Every invoice needs a unique invoice number. This is essential for tracking, accounting, and legal purposes. Implement a sequential numbering system (e.g., INV-001, INV-002, or a date-based system like 2023-08-01). The invoice date is also critical, establishing when the invoice was issued.
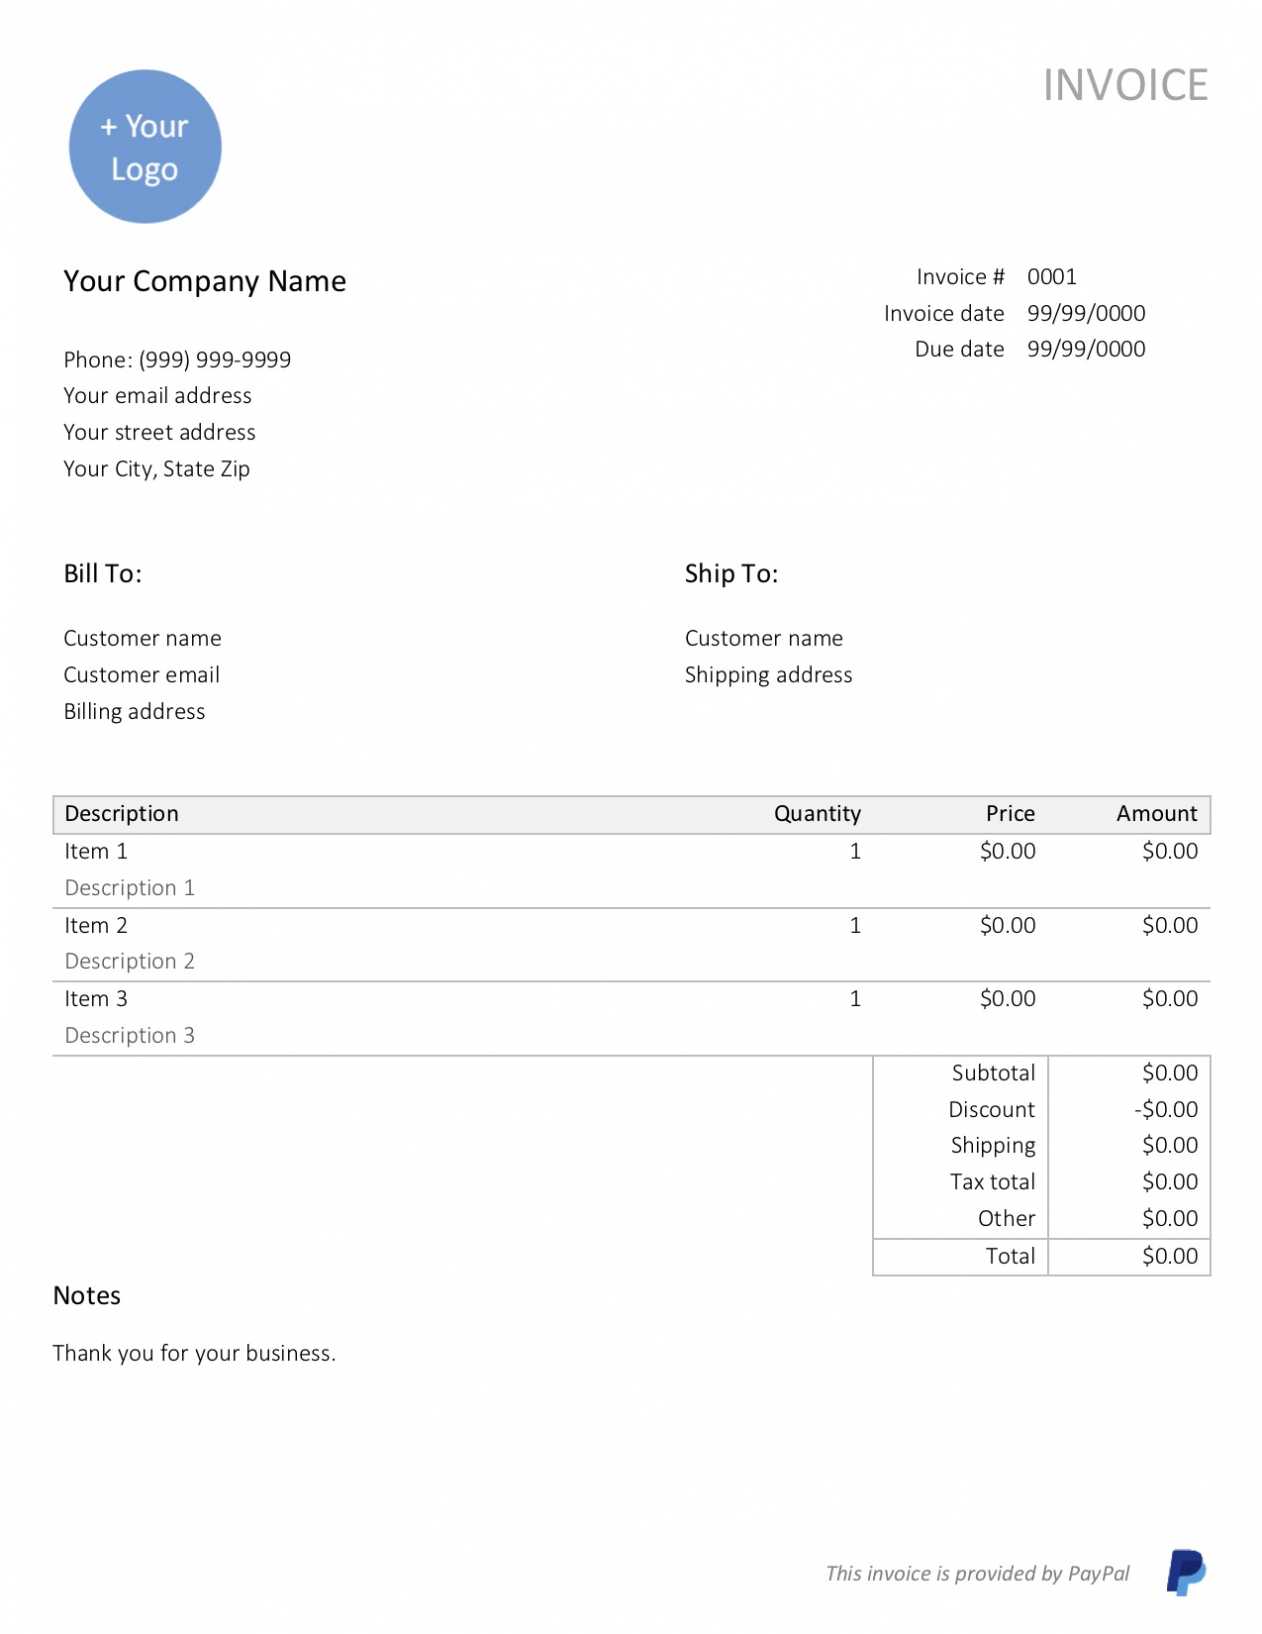
Payment Terms and Due Date
Clearly state your payment terms. This includes the number of days the client has to pay (e.g., "Net 30," meaning payment is due within 30 days of the invoice date), any late payment penalties, and early payment discounts. The due date should be explicitly stated to leave no room for ambiguity.
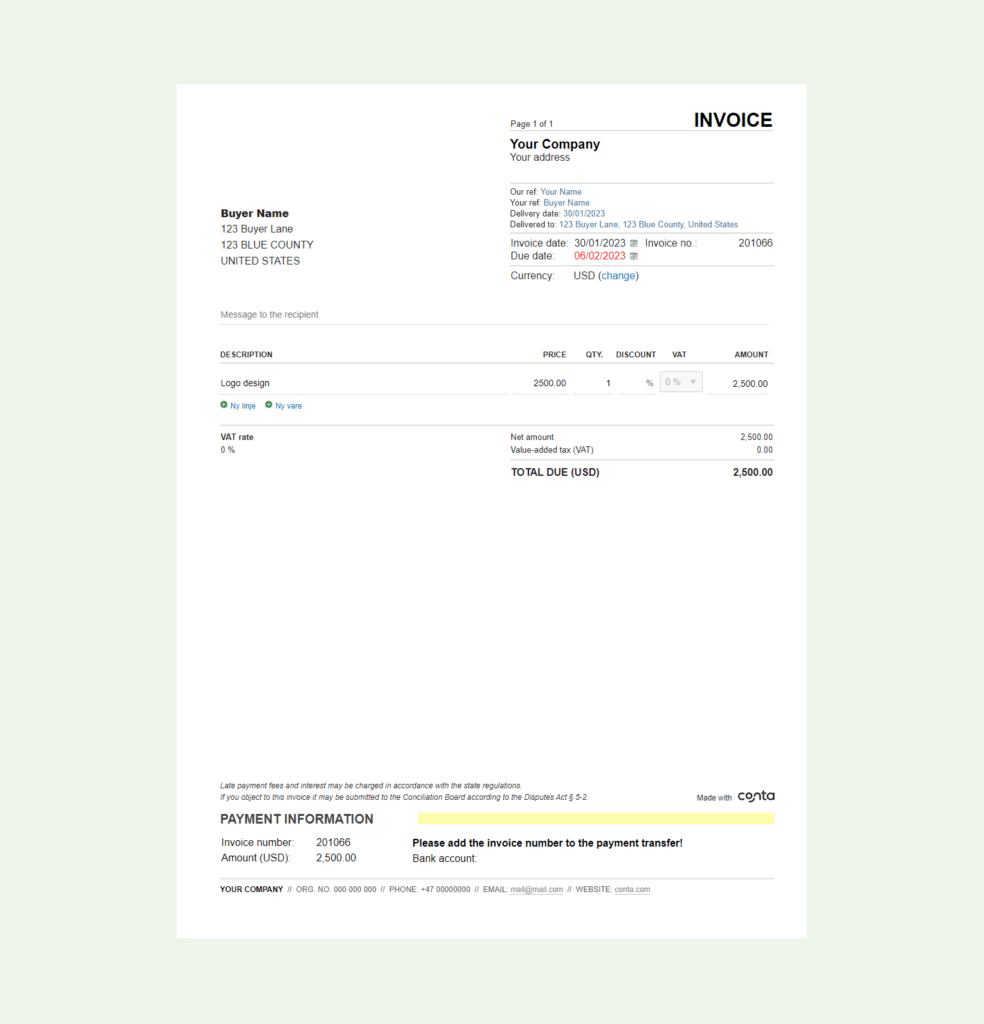
Description of Services/Products
This section is where you detail what you are billing for. Provide a clear, concise description of each service or product provided. Be specific enough that the client understands exactly what they are paying for. For services, mention the dates the work was performed if relevant.
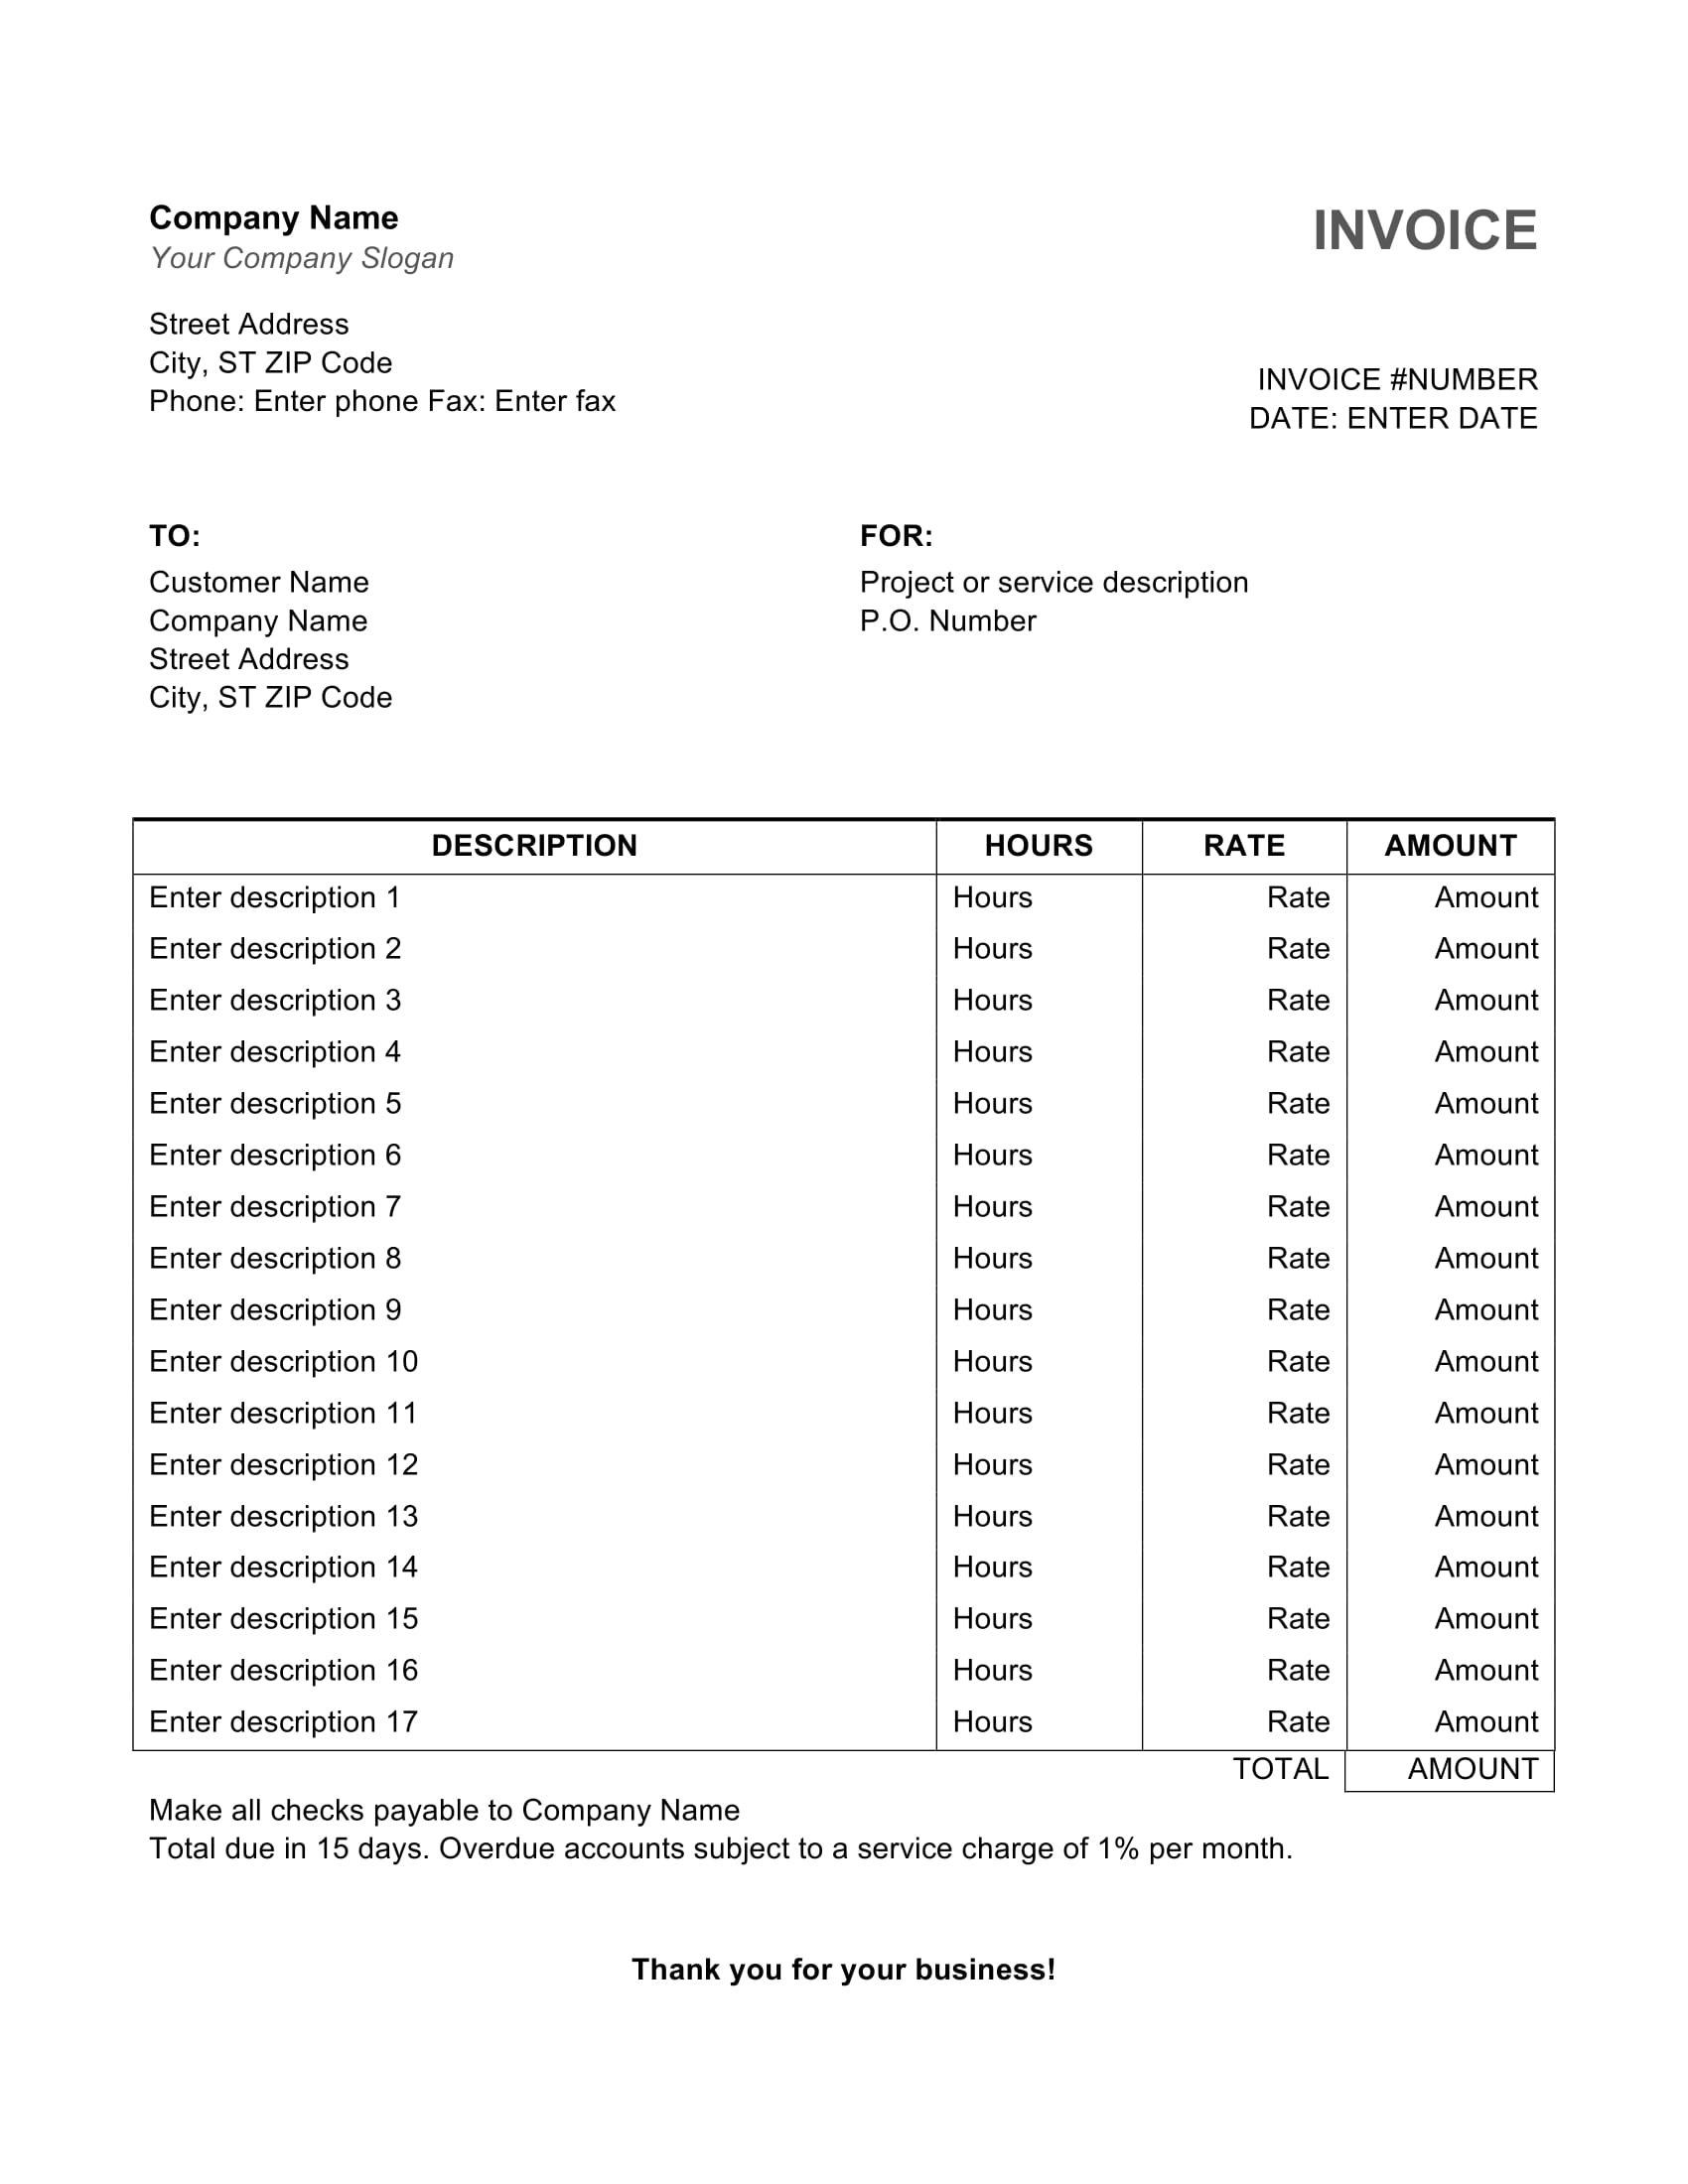
Quantity, Rate, and Amount
For each itemized service or product, list the quantity (e.g., hours worked, number of units), the rate per unit (e.g., hourly rate, unit price), and the total amount for that specific item (quantity x rate).

Subtotal, Taxes, and Total Amount Due
After itemizing everything, calculate the subtotal of all services/products. If applicable, clearly list any taxes (e.g., sales tax, VAT) as a separate line item, including the tax rate. Finally, provide the grand total amount due, which is the subtotal plus any applicable taxes.
Payment Instructions
Make it incredibly easy for your clients to pay you. Include detailed payment instructions, such as bank account details for transfers, links to online payment gateways, or your mailing address for check payments. Specify accepted payment methods (e.g., "We accept bank transfers, credit card via Stripe, and PayPal").
Optional: Notes, Thank You, Signatures
Consider adding a "Notes" section for any specific project details, reference numbers, or special instructions. A simple "Thank You" message can add a personal and professional touch. For certain industries or higher-value invoices, a space for signatures (yours and/or the client's) might be appropriate.
Step-by-Step Guide: How To Write A Invoice Template from Scratch
Creating a robust invoice template doesn't have to be complicated. By following a structured approach, you can ensure all crucial elements are included and the design is professional and easy to use. This guide will show you how to write a invoice template from concept to completion.
Choose Your Platform: Decide whether you'll create your template in a word processor (like Microsoft Word or Google Docs), a spreadsheet program (like Excel or Google Sheets), or a dedicated invoicing software. Word processors offer flexibility in design, spreadsheets are great for calculations, and software automates much of the process. For a manual template, Word or Excel are common starting points.
Start with Your Branding: At the very top, place your company logo (if you have one) and your full business name. Below this, add your complete business address, phone number, email, and website. This instantly identifies the sender.
Add the Invoice Header: Create clear labels like "INVOICE," "TAX INVOICE," or "SALES RECEIPT" to unequivocally state the document's purpose. This helps with client sorting and internal record-keeping.
Incorporate Unique Identifiers:
- Invoice Number: Create a field for a unique invoice number. You can pre-fill a placeholder like
[INV-XXXX]or[YYMMDD-XXX]. - Date of Issue: Add a field for the date the invoice is created, e.g.,
[Date]. - Due Date: Include a field for the payment due date, e.g.,
[Due Date].
- Invoice Number: Create a field for a unique invoice number. You can pre-fill a placeholder like
Detail Client Information: Create a dedicated section for "Bill To" or "Client Details." Include fields for:
- Client's Company Name
- Client Contact Person
- Client Address
- Client Phone Number
- Client Email
Design the Itemized List Section: This is the core of your invoice. Create a table with the following columns:
- Description: For detailing the service or product.
- Quantity: Number of units or hours.
- Rate/Unit Price: Cost per unit or hour.
- Amount: Calculated total for that line item (Quantity x Rate).
- Ensure there are enough rows for multiple items, or design it to allow for easy addition of rows.
Calculate Totals: Below the itemized list, add fields for:
- Subtotal: Sum of all item amounts.
- Discount: If applicable, include a line for any discounts offered.
- Tax Rate/Amount: Clearly state the tax rate and the calculated tax amount.
- Total Amount Due: The final amount the client needs to pay.
Specify Payment Terms and Instructions: Dedicate a section for your standard payment terms (e.g., "Payment due within 30 days"). Crucially, include clear instructions on how to pay:
- Bank transfer details (Bank Name, Account Name, Account Number, SWIFT/IBAN).
- Links to online payment portals (PayPal, Stripe, etc.).
- Mailing address for checks.
Add Optional Professional Touches:
- A brief "Thank You" message.
- A "Notes" section for specific project references or additional comments.
- Your professional license numbers or other regulatory information if required by your industry.
Save and Test: Save your template with a clear name (e.g., "InvoiceTemplate_YourBusinessName.docx"). Before using it with a client, fill out a mock invoice to ensure all calculations are correct, the layout is clear, and no essential information is missing. Make sure it can be easily saved as a PDF for client delivery.
By systematically addressing each of these points, you will create a comprehensive, professional, and highly functional invoice template that streamlines your billing process.
Choosing the Right Format for Your Invoice Template
The format you choose for your invoice template can significantly impact its ease of use, professionalism, and integration with your existing workflows. There are several popular options, each with its own set of advantages and disadvantages.
1. Word Processor Documents (e.g., Microsoft Word, Google Docs):
* Pros: Highly customizable in terms of design and layout. Easy to add logos, specific fonts, and detailed text. Widely accessible, as most businesses use Word or Google Docs.
* Cons: Manual calculations are required, increasing the risk of errors. Not ideal for businesses with high volumes of invoices. Can become cumbersome to manage if not properly organized.
* Best For: Freelancers, small businesses with low invoice volume, or those who need a high degree of design flexibility.
2. Spreadsheet Programs (e.g., Microsoft Excel, Google Sheets):
* Pros: Excellent for automatic calculations. You can set up formulas for subtotals, taxes, and grand totals, drastically reducing errors. Good for tracking multiple invoices within a single file.
* Cons: Design flexibility is more limited compared to Word. May look less "official" without careful formatting.
* Best For: Businesses that need robust calculation capabilities, track inventory, or want to integrate invoicing with basic accounting functions.
3. PDF Documents:
* Pros: Universal compatibility – PDFs look the same on almost any device. Non-editable, which ensures the integrity of the invoice once sent. Professional appearance.
* Cons: Templates must be created in another program (Word, Excel, or dedicated software) and then converted to PDF. Not easily editable by the recipient.
* Best For: The final delivery format for almost all invoices, ensuring what you send is exactly what the client sees.
4. Dedicated Invoicing Software (e.g., FreshBooks, QuickBooks, Wave, Xero):
* Pros: Automates almost every aspect of invoicing, from creation and sending to tracking and payment reminders. Integrates with accounting and banking. Offers professional, customizable templates. Reduces manual errors and saves significant time. Provides insights into cash flow.
* Cons: Can incur monthly subscription costs. May have a learning curve to get started.
* Best For: Businesses of all sizes looking for a comprehensive, automated solution that handles invoicing, expense tracking, and basic accounting. This is often the most efficient option as a business grows.
5. Online Template Builders:
* Pros: Quick and easy to use. Often free or low-cost. Provides basic, clean templates with minimal effort.
* Cons: Limited customization options. May not integrate with other business tools.
* Best For: Freelancers or very small businesses needing a quick, simple solution without the commitment of full software.
Ultimately, the "best" format depends on your business's specific needs, volume of invoices, budget, and desired level of automation. Many businesses start with Word or Excel templates and transition to dedicated invoicing software as they grow.
Best Practices for Using and Managing Your Invoice Template
Creating an invoice template is just the first step. To truly harness its power and ensure smooth financial operations, you need to implement best practices for its ongoing use and management.
1. Consistency is Key:
Always use the same template for all your clients. This ensures a consistent brand image and simplifies your record-keeping. Any minor updates or improvements to your template should be applied universally.
2. Clear Naming Convention:
When saving individual invoices generated from your template, use a consistent and descriptive naming convention. For example: [Year]-[Month]-[Day]_Invoice_[InvoiceNumber]_[ClientName]. This makes it easy to find specific invoices later.
3. Convert to PDF for Sending:
Always send invoices to clients as a PDF. This ensures the document's integrity, prevents accidental edits, and maintains formatting across different devices and operating systems.
4. Keep a Digital Archive:
Maintain an organized digital archive of all sent invoices. Create folders by year, then by client, or by invoice number ranges. This makes retrieval for tax purposes, audits, or client inquiries straightforward.
5. Back Up Your Templates and Invoices:
Regularly back up your invoice templates and your archive of sent invoices. Use cloud storage services (like Google Drive, Dropbox, or OneDrive) or external hard drives to prevent data loss.
6. Follow Up on Overdue Invoices:
Your template helps you create invoices, but you need a system to track them. Implement a follow-up routine for overdue invoices. Polite reminders, starting a few days after the due date, can significantly improve payment times. Many invoicing software solutions automate this.
7. Review and Update Periodically:
Periodically review your invoice template. Are all the details still accurate (contact info, banking details)? Are there any new legal requirements or tax regulations that need to be reflected? Is the design still professional and easy to read? Make updates as necessary.
8. Integrate with Accounting (If Possible):
If you use accounting software, try to integrate your invoicing process with it. Many dedicated invoicing tools sync seamlessly with accounting platforms, simplifying data entry and financial reporting. Even with manual templates, ensure the data you're collecting aligns with your accounting needs.
Common Mistakes to Avoid When Creating Your Invoice Template
While creating an invoice template can seem straightforward, a few common pitfalls can undermine its effectiveness and lead to administrative headaches or even financial loss. Being aware of these can help you build a robust and reliable template.
1. Incomplete Information:
One of the most frequent mistakes is omitting critical details. This includes missing client contact information, an unclear description of services, or, most importantly, absent payment terms or instructions. Incomplete invoices often lead to payment delays because the client needs to contact you for clarification. Ensure every mandatory field discussed earlier is present.
2. Unclear Payment Terms:
Vague payment terms like "Payment due upon receipt" can be ambiguous. Always specify a clear due date (e.g., "Payment due by August 31, 2024") or a specific period (e.g., "Net 30 days"). Also, explicitly state any late payment penalties or interest charges to encourage timely payment.
3. Lack of Professionalism:
A sloppy or poorly designed invoice template reflects poorly on your business. Avoid overly decorative fonts, mismatched colors, or a cluttered layout. Your template should be clean, easy to read, and consistent with your brand identity. Typos and grammatical errors are also major red flags.
4. Not Including a Unique Invoice Number:
Every invoice must have a unique identifier. Failing to include a sequential or date-based invoice number can lead to confusion in your accounting records, make it difficult to track payments, and cause issues during tax season or audits.
5. Manual Calculation Errors:
If you're using a word processor template, relying solely on manual calculations for subtotals, taxes, and grand totals is a recipe for errors. Even simple arithmetic mistakes can lead to undercharging, overcharging, or having to reissue invoices, all of which are time-consuming and unprofessional. If not using software, consider using an Excel template with built-in formulas.
6. Forgetting Tax Information:
Depending on your region and business type, you may need to include specific tax registration numbers (e.g., VAT ID, GST number) on your invoices. Failing to do so can result in non-compliance with tax laws. Always clearly itemize taxes charged, if applicable.
7. Inadequate Payment Instructions:
Making it difficult for clients to pay is a surefire way to delay receiving funds. If you only provide a mailing address for checks when the client prefers online payments, you're creating an unnecessary barrier. Include multiple clear payment options and detailed instructions for each.
8. Not Proofreading:
Before sending any invoice, proofread it thoroughly. Check for spelling errors, incorrect numbers, wrong client details, and ensure all calculations are accurate. A fresh pair of eyes can often catch mistakes you've overlooked.
Avoiding these common mistakes will ensure your invoice template serves its purpose effectively, promoting clarity, professionalism, and timely payments for your business.
Conclusion
Mastering the art of how to write a invoice template is more than just an administrative task; it's a fundamental pillar of sound financial management and professional client relations. A thoughtfully designed and consistently utilized invoice template streamlines your billing process, significantly reduces the potential for errors, and projects an image of reliability and professionalism that can strengthen your brand.
Throughout this guide, we've explored the critical components that make an invoice effective, from your business and client information to clear payment terms and detailed itemizations. We've outlined a step-by-step approach to building your template, highlighted the benefits of various formatting options, and provided best practices for its ongoing use and management. By actively avoiding common pitfalls such as incomplete information or unclear payment instructions, you can ensure your invoices facilitate smooth transactions rather than creating obstacles.
Whether you opt for a simple word processor template, a robust spreadsheet, or a dedicated invoicing software solution, the principles remain the same: clarity, accuracy, and professionalism are paramount. Investing the time to create and maintain a high-quality invoice template will not only save you countless hours in the long run but also contribute directly to healthier cash flow and more successful business operations. Your invoice is often the last impression you make with a client regarding a transaction – make it count.
0 Response to "How To Write A Invoice Template"
Posting Komentar